Slab Photo Calibration: From Phone Photo to Production-Ready Layout
The quality of your calibration determines the quality of your layout. Here is how to get it right every time.
Slab photo calibration is the process of turning a raw phone photograph into a dimensionally accurate digital surface. Good calibration means accurate layouts, precise vein matching, and reliable DXF exports. Poor calibration means measurements you cannot trust. This guide covers everything you need to know about photographing, measuring, and calibrating stone slabs for digital layout.
What makes a good slab photo
A good slab photo for calibration does not require professional photography skills or equipment. It requires attention to a few practical details that directly affect the quality of your calibrated image and, downstream, the accuracy of your layout.
Even lighting is the single most important factor. Harsh shadows from direct sunlight or overhead shop lights create dark bands across the slab that obscure vein details. Glare from wet surfaces or polished finishes can wash out entire regions of the photo. The ideal conditions are diffused natural light — an overcast day, open shade, or a well-lit indoor area without strong directional lighting. If you are photographing outdoors, early morning or late afternoon light is better than midday sun.
Capture the entire slab plus all four calibration targets in a single frame. Do not crop targets out of the frame. Stand about 1.5 to 2 meters from the slab — close enough that vein details are clearly visible, far enough that everything fits. You do not need to be directly overhead. The rectification algorithm corrects for camera angle and perspective, so a natural standing position works fine.
Quick photo checklist
- ✓Even, diffused lighting — no harsh shadows or bright glare spots across the slab surface
- ✓Entire slab visible in frame with all four calibration targets included
- ✓Standing distance of 1.5 to 2 meters — close enough for vein detail, far enough for full coverage
- ✓Wet the slab surface before shooting to improve vein contrast on natural stone (marble, granite, quartzite)
- ✓Phone held steady — no motion blur. Lean against something or brace your elbows if needed
- ✓No obstructions — feet, shadows, other slabs, or equipment blocking part of the slab or any target
Wetting the surface is particularly important for natural stone. A dry marble or quartzite slab can look washed out in photos, making veins nearly invisible. A wet surface reveals the full depth of the stone's movement and color — the same way it will look once sealed and installed. This gives your client a more accurate preview and gives you better vein alignment information during layout.
Where to place calibration targets
Target placement is the second most important factor in calibration quality, after measurement accuracy. Four targets are placed on the slab surface before photographing. Their positions define the reference frame that the rectification algorithm uses to transform your angled photo into a true-scale top-down image.
Place targets near the four corners of the slab, but inside the slab boundaries. Each target should sit flat on the slab surface — not hanging off an edge, not stacked on a bump or chip, not sitting on a different surface. The targets need to be in the same plane as the slab face you are calibrating.
Spread the targets as far apart as practical. The wider the target separation, the more accurate the calibration will be across the full slab surface. Think of it like surveying — the farther apart your reference points, the more precisely you can locate everything between them. If you cluster all four targets in the center of the slab, calibration accuracy at the edges degrades significantly.
Target placement rules
- 01Place each target at least 100mm inside the slab edge. Targets too close to the edge risk falling off or being obscured by the slab frame.
- 02Distribute targets to form a large quadrilateral — ideally close to a rectangle. Avoid placing three targets in a line with the fourth offset. The more rectangular the layout, the better the calibration coverage.
- 03Make sure each target is fully visible in the photo. A target partially hidden behind your foot, a tool, or a shadow cannot be accurately marked in the software.
- 04Press targets flat against the slab surface. A target sitting at an angle introduces a parallax offset that degrades accuracy when you mark its center.
- 05On slabs with significant surface texture or natural pitting, choose flat areas for target placement. An uneven surface under the target makes center identification less precise.
How to measure between targets
Your measurements are the single most important input to the calibration process. The rectification math is precise — the only source of error is the quality of the distances you provide. Careful measurement translates directly to an accurate calibrated image. Sloppy measurement produces a distorted result that undermines every layout you build on top of it.
Use a rigid steel tape measure. This is not negotiable. A cloth tape or flexible measuring tape sags under its own weight between measurement points, giving you a reading that is longer than the true straight-line distance. On a typical slab measurement of 2,000mm, tape sag can add 3-5mm of false length. That error propagates through the entire rectification and degrades your downstream layout accuracy.
Measure from the center of one target to the center of the next. Not the near edge. Not the far edge. The center. This is where you will mark the target position in the software, and the measurement needs to correspond to that same point. A 5mm offset between where you measured and where you marked means a 5mm error in your calibration — and that error is amplified at distant points on the slab.
Record at least four distances — the four sides of the quadrilateral formed by your targets. These four measurements, combined with the four target positions marked in the software, give the algorithm enough data to solve the projective transformation. Some users also measure one or both diagonals as a cross-check. If the diagonal measurement does not match what the software calculates from the four side measurements, you know one of your measurements is off.
Measure to the nearest millimeter. Rounding to the nearest centimeter is not accurate enough — a 5mm rounding error on each measurement compounds through the rectification. Write down each measurement immediately. Do not try to remember four numbers while walking back to your computer.
Double-check any measurement that looks inconsistent. If you placed targets roughly in a rectangle and three sides measure around 2,400mm, but the fourth measures 2,250mm, re-measure that fourth side. Inconsistent measurements usually mean you measured to the wrong target, read the tape incorrectly, or the tape shifted during the measurement.
Common calibration mistakes
Most calibration problems come down to six common mistakes. Avoid these and your rectified images will be consistently accurate.
Targets too close together
Clustering targets in the center of the slab gives the algorithm a small reference frame to work with. Calibration accuracy at the slab edges — where you are actually cutting pieces — degrades significantly. Spread targets to the corners. The wider the reference quadrilateral, the better the accuracy across the full surface.
Not measuring to target center
Measuring to the edge of a target instead of its center introduces a systematic offset. If each target is 30mm in diameter and you consistently measure to the near edge, every measurement is off by 15mm. That 15mm error at the target becomes a larger error at distant points on the slab. Always measure center-to-center.
Using a flexible or cloth tape
Flexible tapes sag between measurement points. On a 2-meter span, sag can add 3-5mm to the reading. Over four measurements, that compounds into enough error to push your rectification outside of production tolerances. Use a rigid steel tape measure that holds its shape between endpoints.
Bad lighting hiding vein details
Calibration accuracy is about measurements, but the purpose of the calibrated image is layout and vein matching. If your photo has harsh shadows, blown-out glare, or washed-out colors because of poor lighting, the rectified image will be technically accurate but practically useless for vein alignment. Take the extra minute to find good light or wet the surface.
Photo taken too far away
Standing too far from the slab captures it in frame easily but sacrifices resolution. When you zoom into the rectified image to align veins at a seam line, you need pixel-level detail. A photo taken from 5 meters away may not have enough resolution to distinguish fine vein structures. Stay within 1.5 to 2 meters for the best balance of coverage and detail.
Obstructing a target
Your foot, a shadow, the edge of another slab, a tool — anything that partially covers a target makes it impossible to mark its center accurately in the software. Before pressing the shutter, look at the screen and confirm all four targets are fully visible and unobstructed. This takes two seconds and saves a trip back to the slab yard.
From calibration to layout
Once your slab photo is calibrated, it stops being a photograph and becomes a dimensionally accurate layout surface. Every pixel has a real-world coordinate. You can measure distances on screen and they correspond to actual distances on the physical slab. This is the foundation that makes the rest of the digital workflow possible.
From here, you drag countertop template pieces onto the calibrated image. Position them to optimize vein direction, minimize waste, and align grain patterns across seams. The slab layout software shows real-time measurements as you move pieces — exact dimensions, distances from edges, seam lengths, and remaining material.
Vein matching becomes visual and precise. Instead of holding a paper template against the slab and squinting at grain lines, you see exactly how the vein pattern flows through each piece and across each seam on screen. The vein matching tools let you rotate, mirror, and nudge pieces until the alignment is right.
When the layout is ready, send your client a shareable approval link. They see the actual slab with the actual pieces positioned on it — not a rendering, not a simulation, but their stone with their countertop layout. Digital sign-off eliminates the "that is not what I expected" conversation that leads to remakes.
Finally, export the approved layout as a CNC-ready DXF file. The DXF carries the real-world dimensions established during calibration, so your CNC saw or waterjet cuts the pieces exactly as they appear on screen. Calibration accuracy flows all the way through to the finished countertop. That is why getting it right matters. Learn more about the rectification technology that makes calibration possible.
Works with any slab material
Slab photo calibration is material-agnostic. The calibration process relies on physical measurements and target positions — not on the material type. If you can place targets on it and photograph it, you can calibrate it.
Granite
From uniform Salt and Pepper to dramatic Cosmic Black, granite photographs well in most lighting conditions. Wet the surface to bring out movement and color depth. Polished finishes may require angle adjustment to avoid glare.
Marble
Marble is where calibrated layout delivers the most value. Calacatta, Statuario, Arabescato — veined marbles demand precise vein alignment across seams. A wet surface is essential for revealing the full vein structure in photos.
Quartzite
Heavily veined quartzites like Taj Mahal, Patagonia, and Mont Blanc benefit enormously from digital layout. The dramatic movement in these materials makes vein matching critical — and a calibrated slab photo makes vein matching possible.
Porcelain slabs
Large-format porcelain slabs from Dekton, Neolith, and similar manufacturers have consistent, repeatable patterns that photograph cleanly. Calibration works identically to natural stone — same targets, same measurements, same process.
Engineered quartz
Caesarstone, Cambria, Silestone, and other engineered quartz brands. While veining is less dramatic than natural stone on many colors, calibrated layout still matters for seam visibility, piece optimization, and client approval workflows.
Sintered stone
Ultra-compact surfaces like Lapitec and certain Dekton lines. These materials often feature full-body veining that requires careful alignment across seams. Calibrated slab photos let you plan seam placement to minimize visual disruption.
Explore material-specific layout tips in our learning center or see how calibration fits into the full slab layout workflow.
Common questions about slab photo calibration
What phone do I need for slab photo calibration?
Any modern smartphone works. iPhone, Samsung, Google Pixel, or any Android device with a camera made in the last several years will produce photos with sufficient resolution and clarity for accurate slab calibration. You do not need the latest model or the highest-end camera. A phone that takes a clear, well-lit photo is all that is required.
How close should I stand when photographing a slab?
Stand about 1.5 to 2 meters from the slab — close enough that vein details are clearly visible, but far enough back that the entire slab and all four calibration targets fit in the frame. If you are too far away, fine vein details will be lost and layout precision drops. If you are too close, you may not capture all targets in one shot, which means you cannot calibrate.
Does the photo need to be taken directly overhead?
No. You do not need to be directly overhead. SlabKast uses projective rectification to correct for camera angle and perspective distortion. You can photograph the slab from a natural standing position at an angle. The software will transform the image into a true top-down view using the calibration target positions and your measurements.
How many calibration targets do I need?
Four calibration targets are required. Place them on the slab surface, spread across the area for good coverage — ideally near the four corners but inside the slab boundaries. Four targets provide the minimum reference points needed for the projective transformation that converts your angled photo into a calibrated, dimensionally accurate image.
What accuracy can I expect from a calibrated slab photo?
With careful target placement and accurate measurements, calibrated slab photos achieve 1-2mm accuracy across the full slab surface. This is well within the tolerance requirements for countertop fabrication, where standard piece dimension tolerances are typically 1.5-3mm. The accuracy depends primarily on the quality of your physical measurements between targets.
Can I calibrate a slab that is leaning against a wall?
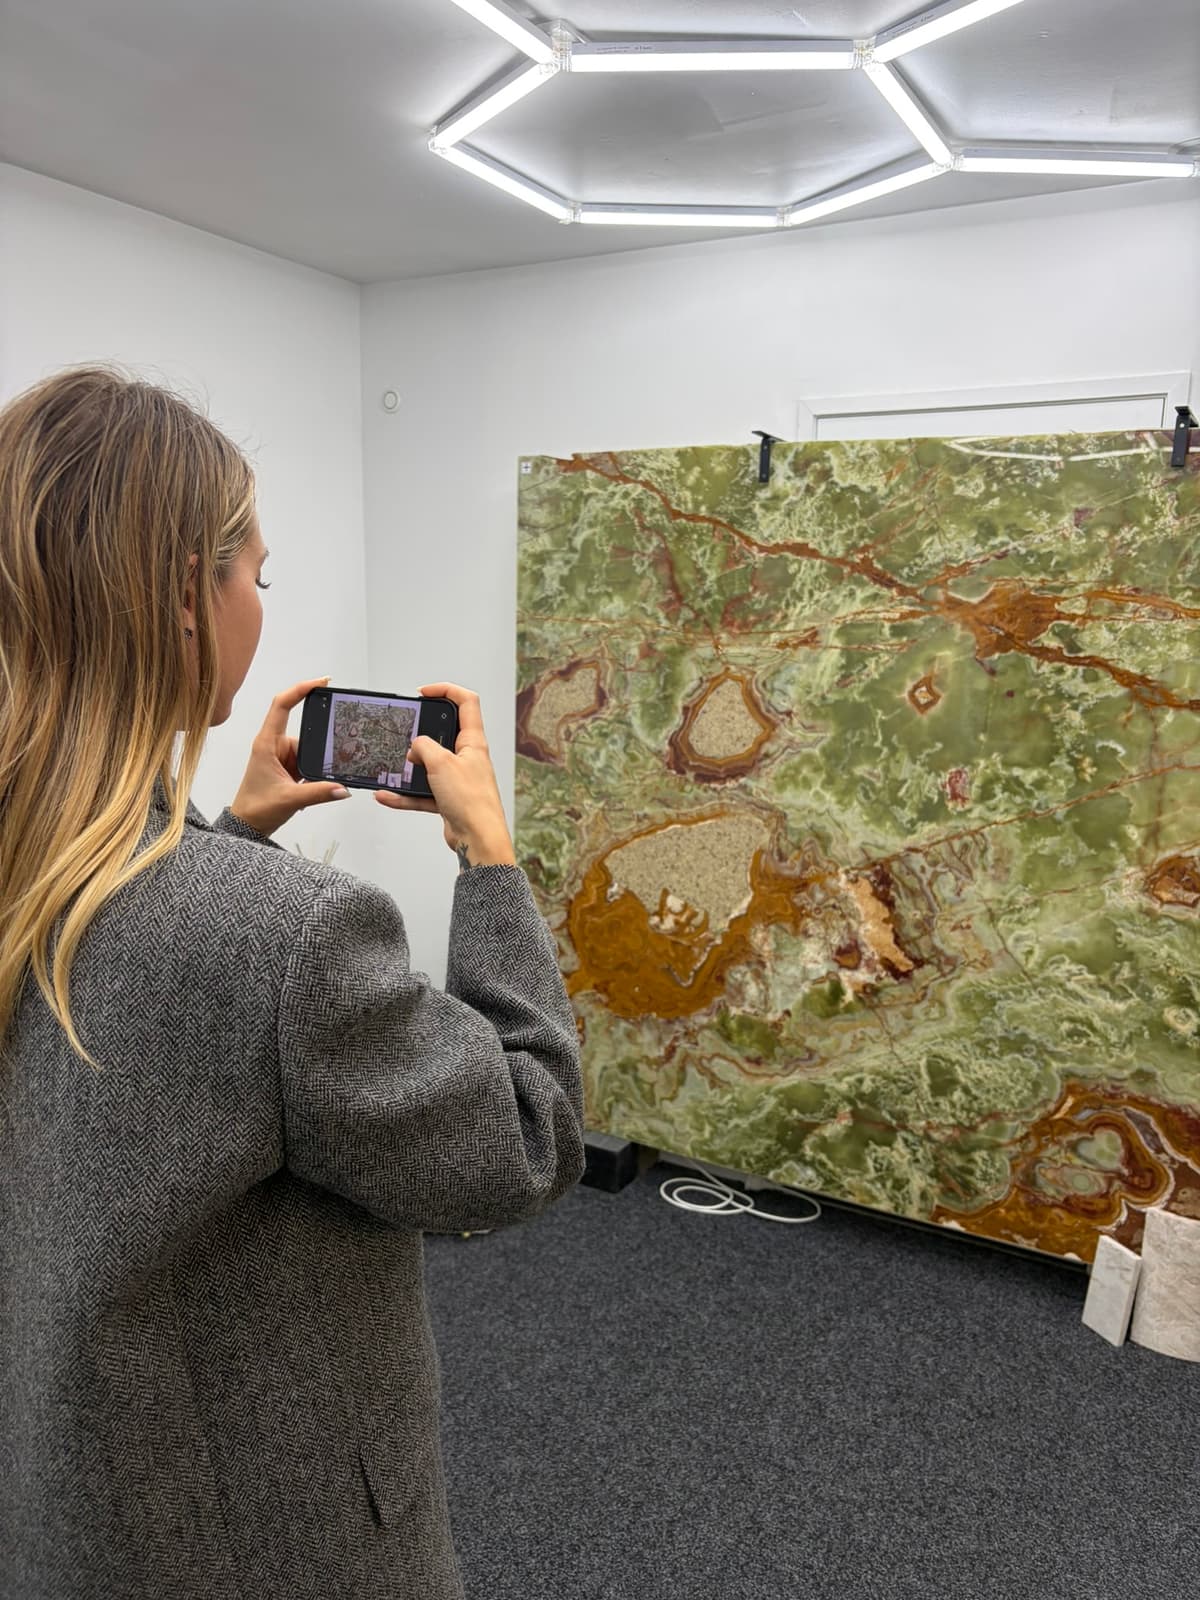
Calibration works best when the slab is lying flat on an A-frame rack or table so you can place targets on the surface and measure between them accurately. A slab leaning nearly vertically against a wall makes target placement and measurement difficult. If possible, lay the slab flat or at a shallow angle before calibrating. If the slab must remain upright, ensure the targets are secure and your measurements account for the slab angle.
Calibrate your first slab in under 5 minutes.
Four targets. A tape measure. Your phone. That is all you need to turn a slab photograph into a dimensionally accurate layout surface.
Start your 7-day free trial today. Photograph a slab, calibrate it, and see the difference accurate digital layout makes for your shop and your clients.
Want to understand the math behind calibration? Read about slab rectification technology →