Slab Rectification: Turn Any Phone Photo Into a Calibrated Layout Surface
Four targets. Four measurements. One calibrated slab — accurate to within 1-2mm across the full surface.
Slab rectification is the core technology that makes phone-based slab layout possible. It transforms an angled, perspective-distorted photograph into a dimensionally accurate, true-scale digital surface — without a scanner, without a photo station, and without any specialized hardware.
Watch: Slab Rectification Walkthrough
What is slab rectification?
When you take a photo of a slab with your phone, the image is distorted. You are standing at an angle, not directly overhead. The camera lens introduces barrel distortion. The far edge of the slab appears shorter than the near edge because of perspective foreshortening. If you tried to measure anything on that raw photograph, the numbers would be wrong — sometimes by centimeters.
Slab rectification is the mathematical correction of that distortion. It takes the distorted photograph and transforms it into a true top-down view at real-world scale. After rectification, every pixel in the image corresponds to a real-world position on the slab surface. You can measure distances on screen and they match reality.
This is not cropping. It is not straightening. It is not a filter. It is a projective transformation — a mathematical operation that maps points from a distorted plane onto a corrected plane using known reference positions. The same class of mathematics is used in satellite imagery, architectural photogrammetry, and machine vision. SlabKast applies it specifically to stone slab photography for fabrication layout.
The process relies on four calibration targets placed on the slab surface. You photograph the slab with the targets visible, then mark the target positions in the software and enter the measured distances between them. The software uses these known real-world measurements as anchor points to calculate the exact transformation needed to correct the perspective distortion in your specific photograph.
The result is an image that behaves like a precise technical drawing. You can place countertop template pieces on it and know that the dimensions are correct. You can see exactly how much material remains after cutting. You can identify where veins will align across seam lines. Every measurement you make on the rectified image reflects the actual physical dimensions of the slab.
This is what makes phone-based layout possible. Without rectification, a phone photo is just a picture. With rectification, it becomes a calibrated production surface — functionally equivalent to a scanner image for layout purposes, at a fraction of the cost.
The five-step rectification process
Rectification takes under five minutes from start to finish. Once your team has done it a few times, it becomes second nature — faster than setting up a scanner and far simpler than wrestling with dedicated photo station hardware.
Place four targets on the slab
Set four calibration targets on the slab surface, spread across the area for good coverage. Position them near the corners but inside the slab boundaries. The wider the target spread, the more accurate the calibration will be across the full surface. Avoid clustering targets in one area — even distribution matters.
Photograph the slab with your phone
Take a photo that captures the entire slab and all four targets. You do not need to be directly overhead — the rectification algorithm corrects for camera angle. Stand about 1.5 to 2 meters from the slab. Ensure even lighting so vein details are visible. A wet surface often improves vein contrast on natural stone.
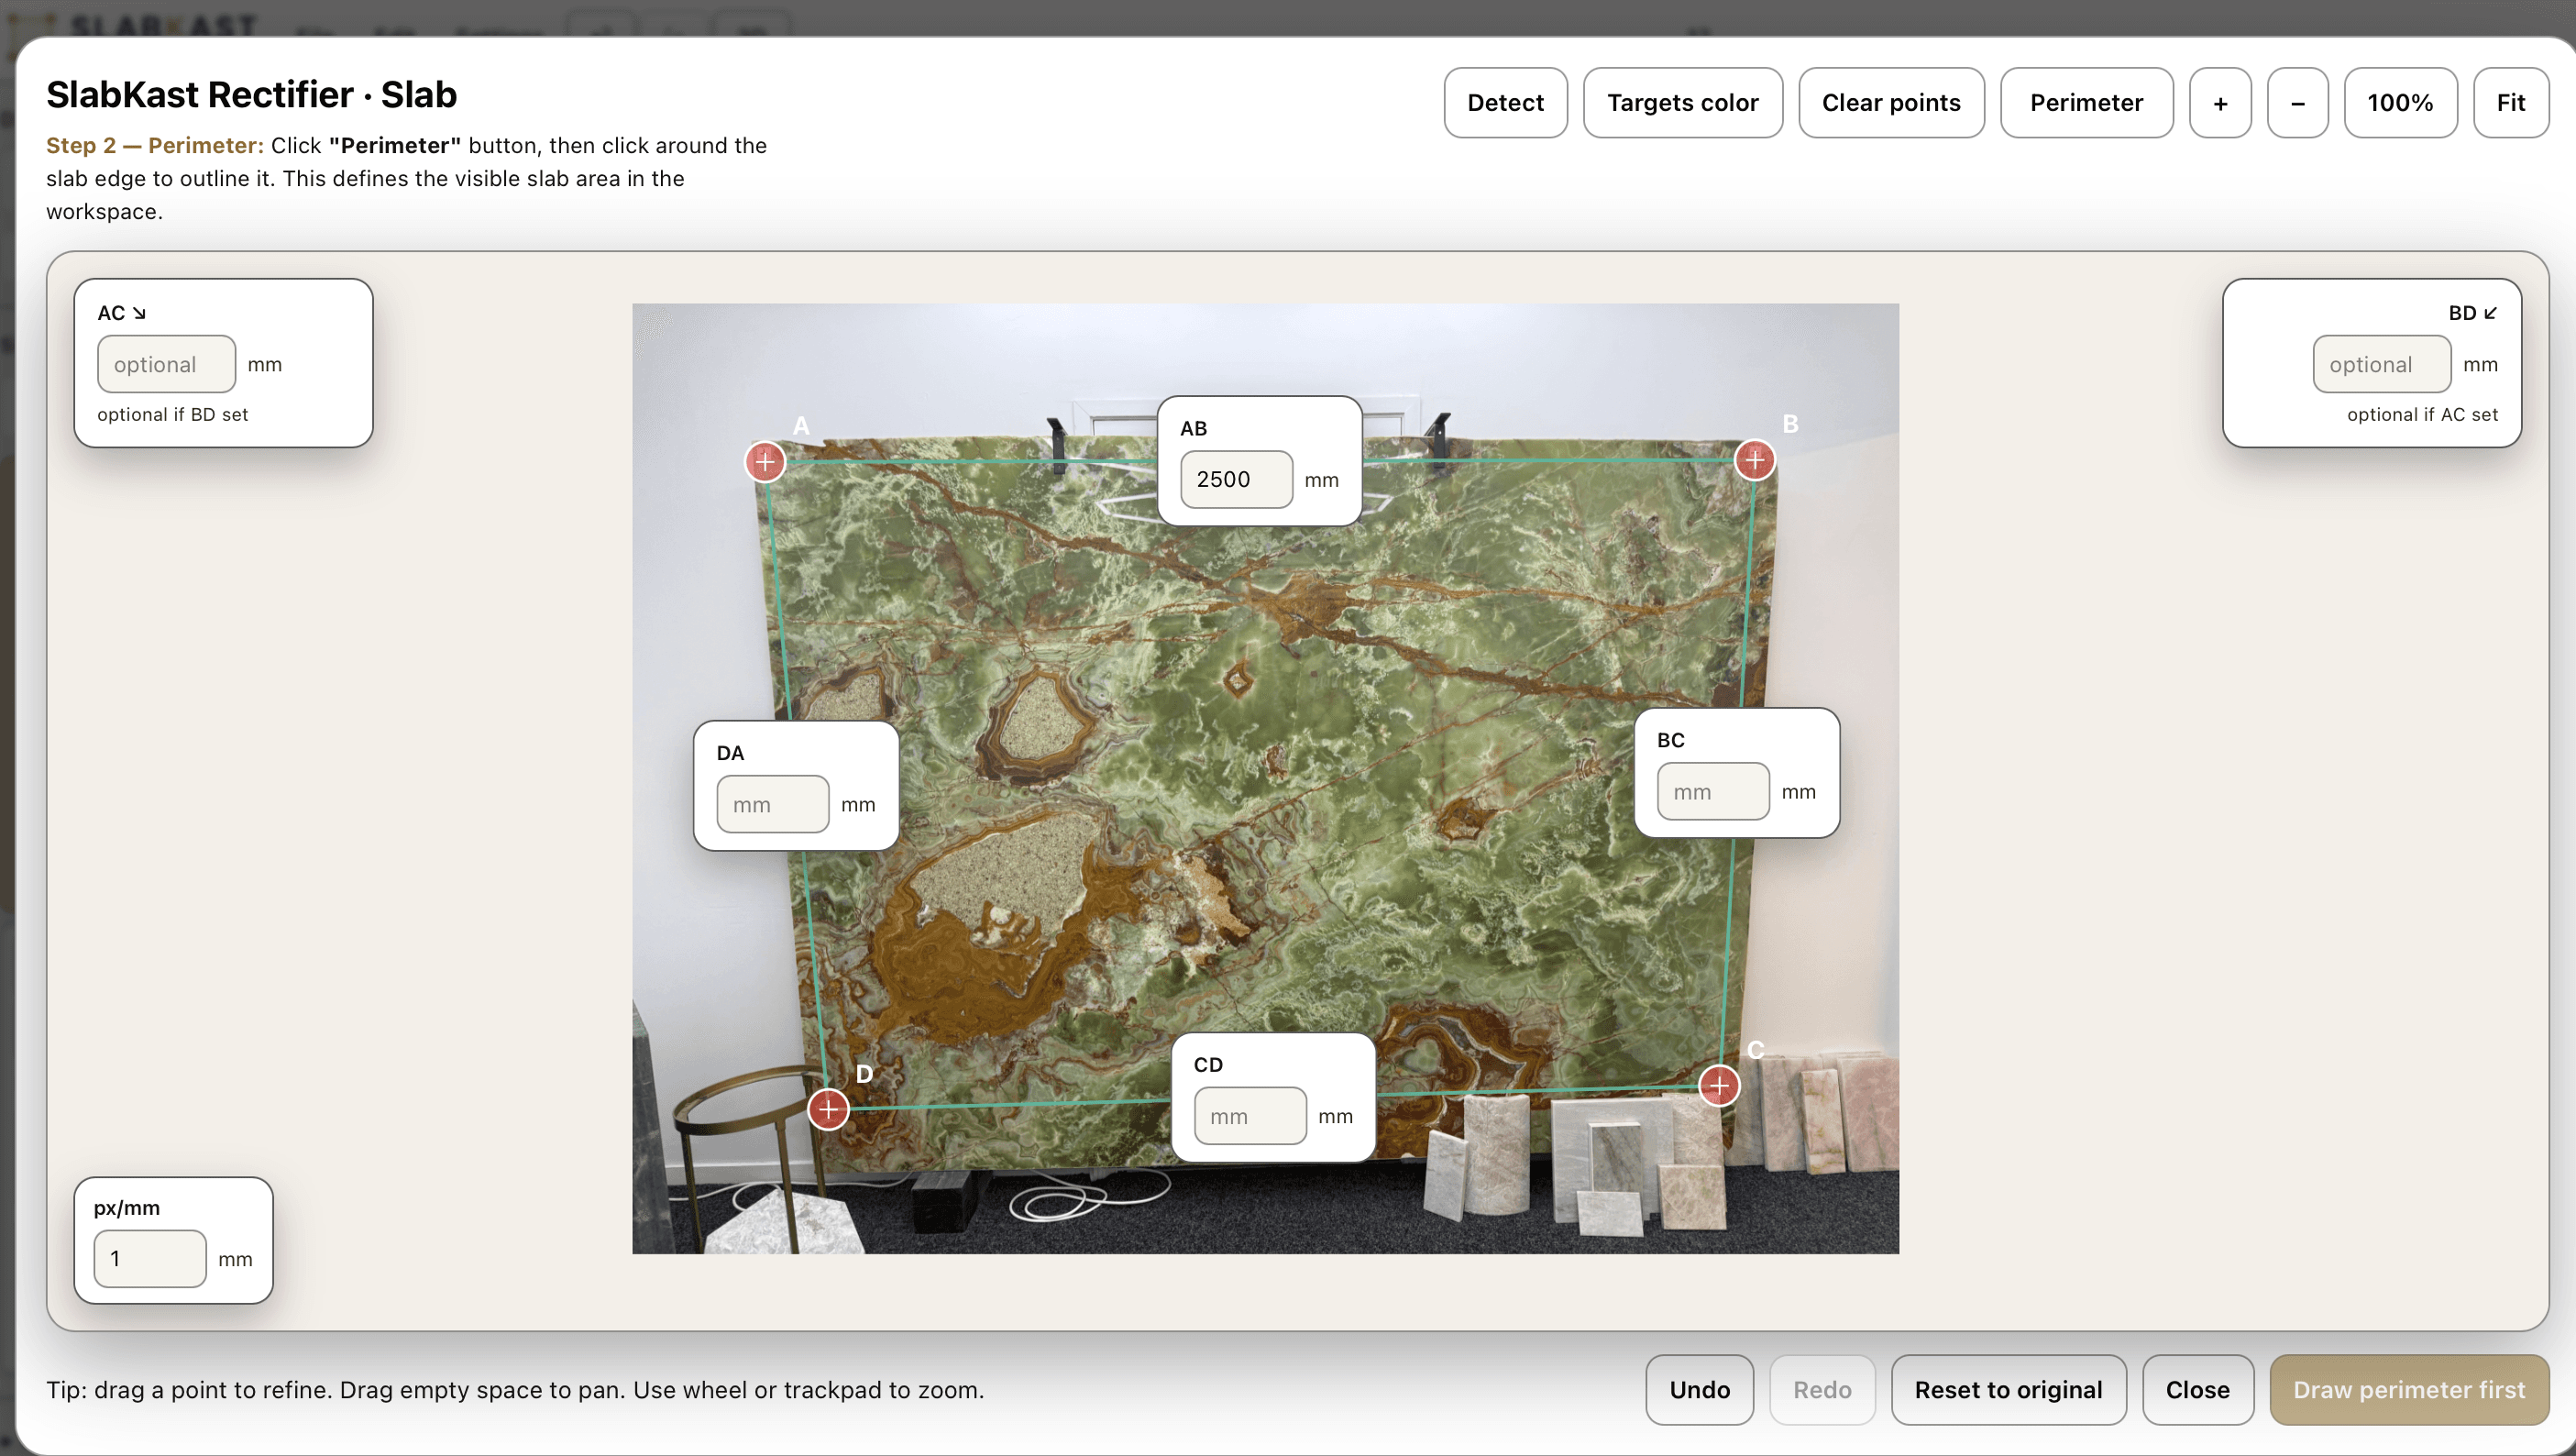
Mark target positions in the software
Upload the photo to SlabKast and click on each of the four targets in the image. The software needs to know where the targets appear in the photograph so it can map them to their real-world positions. Zoom in for precision — marking the exact center of each target improves accuracy.
Enter measured distances
Enter the real-world distances you measured between the targets. These measurements are what give the software its scale reference. Use a rigid tape measure, measure from the center of one target to the center of another, and record to the nearest millimeter. The software uses at least four distances to solve the transformation.
Software rectifies to true scale
SlabKast calculates the projective transformation and applies it to the photograph. In seconds, your angled phone photo becomes a dimensionally accurate, top-down slab image at true scale. Every pixel now has a real-world coordinate. The rectified image is ready for layout — drag template pieces onto it, measure distances, match veins, and export.
The entire process takes less than five minutes. Most of that time is spent on physical measurement. The software computation is nearly instantaneous. After rectification, you proceed directly to layout and piece placement.
Why accuracy depends on your measurements
The mathematics behind slab rectification are precise. The projective transformation is a well-understood geometric operation with no inherent error margin. If you give the software perfect measurements, it will produce a perfectly rectified image.
The accuracy variable is human measurement. When you measure the distance between two calibration targets with a tape measure, that measurement has a tolerance. If you are careful — using a rigid tape measure, pulling it taut, measuring to the center of each target, and reading to the nearest millimeter — your measurement accuracy will be within half a millimeter. That translates to a rectified image accurate to 1-2mm across the full slab surface.
If you are sloppy — using a cloth tape that sags, measuring to the edge of a target instead of the center, rounding to the nearest centimeter — your accuracy degrades proportionally. A 5mm measurement error at the targets can propagate to a centimeter or more at distant points on the slab. The software cannot correct for bad input data.
Best practices for accurate measurement
- 01Use a rigid steel tape measure, not a cloth or flexible tape. Rigid tapes maintain consistent length and do not sag between measurement points.
- 02Measure from the center of one target to the center of the next target. Not the edge. Not the corner. The center. Consistency matters.
- 03Record measurements to the nearest millimeter. Rounding to the nearest centimeter introduces unnecessary error that degrades the entire rectification.
- 04Double-check any measurement that seems inconsistent with the others. If three sides of your target quadrilateral are around 2,000mm and one is 1,850mm, re-measure that one.
- 05Keep the tape flat on the slab surface. A tape that lifts off the surface reads longer than the actual point-to-point distance, introducing error.
Scanner vs phone rectification
Both approaches produce a calibrated slab image suitable for digital layout. The difference is cost, location flexibility, and the last fraction of a millimeter in measurement accuracy.
Dedicated Scanner System
- Measurement accuracySub-millimeter
- Hardware cost$15,000 – $60,000
- LocationFixed photo station
- CalibrationAnnual contract required
- Floor space80 – 120 sq ft
- Setup time2 – 4 weeks
Phone Rectification (SlabKast)
- Measurement accuracy1 – 2mm
- Hardware cost$0 (use your phone)
- LocationAnywhere
- CalibrationNone needed
- Floor space0 sq ft
- Setup time10 minutes
The accuracy difference between sub-millimeter and 1-2mm sounds significant in the abstract. In practice, for countertop fabrication, it rarely matters. Standard countertop tolerances allow for 1.5mm to 3mm of variance in piece dimensions. CNC saws themselves have kerf tolerances. Template-to-actual variance from field measurements is typically 2-3mm. A 1-2mm rectification accuracy sits well within the cumulative tolerance stack of a standard countertop job.
For the small percentage of projects that truly require sub-millimeter slab measurement — large-format porcelain with zero-tolerance bookmatching, for example — a scanner system may be justified. For the other 90-plus percent of countertop work, phone rectification delivers production-grade accuracy at zero hardware cost. Read more about slab layout without a scanner.
Where rectification fits in the workflow
Rectification is step one. It is the foundation that everything else builds on. Without a calibrated slab image, you cannot do accurate digital layout. With one, every downstream step — from piece placement to CNC export — inherits the dimensional accuracy established during rectification.
Rectify the slab photo
Place targets, photograph, calibrate. You are here.
The calibration you establish during rectification carries through the entire workflow. Piece dimensions, seam positions, vein alignment — all of it depends on the accuracy of that initial rectified image. That is why getting rectification right matters. It is not a throwaway step. It is the measurement foundation of your entire digital layout. For a deeper look at the photography side, see our guide on slab photo calibration.
No scanner. No Proliner. No hardware.
You do not need a $15,000 scanner to create accurate slab layouts. You do not need a Proliner. You do not need a dedicated photo station, a calibrated camera rig, or a six-figure capital investment. You need a phone and a tape measure.
Slab rectification is the technology that makes this possible. It takes the one piece of equipment that every fabricator already carries in their pocket and turns it into a precision measurement tool. The math does not care whether the image came from a $50,000 scanner or a three-year-old iPhone. It cares about the quality of the reference measurements you provide.
This changes who can afford digital layout. A one-person shop running 10 jobs a month can use the same layout workflow as a 200-job operation with a full Slabsmith system. A mobile fabricator working out of a truck can rectify a slab at a supplier's warehouse and build a layout on the drive back. A new shop in its first year can offer clients digital slab visualization without taking on equipment debt.
Digital slab layout should not be a luxury reserved for shops that can write a $30,000 check. Slab rectification makes it accessible to every fabricator, regardless of shop size, budget, or location. Learn more about slab layout without a scanner or explore the full slab layout software platform.
Common questions about slab rectification
What is slab rectification?
Slab rectification is the mathematical process of transforming a perspective-distorted phone photo of a stone slab into a dimensionally accurate, true top-down image. Using four calibration targets placed on the slab surface and real-world measurements between them, the software applies a projective transformation to correct for camera angle, lens distortion, and perspective foreshortening. The result is a calibrated image where every pixel corresponds to a real-world coordinate at true scale.
How accurate is slab rectification with a phone photo?
With careful measurements between calibration targets, slab rectification achieves accuracy within 1-2mm across the full slab surface. The math behind the projective transformation is precise — the accuracy variable is the quality of your physical measurements. Using a rigid tape measure, measuring to the center of each target, and double-checking your numbers will consistently produce results within that 1-2mm range.
Do I need a specific phone or camera for slab rectification?
No. Slab rectification works with any smartphone camera made in the last several years. iPhone, Android, tablet — any device that takes a reasonably clear photo will work. You do not need a DSLR, a tripod, or any specialized photography equipment. The rectification algorithm compensates for the angle and perspective of whatever camera you use.
How does slab rectification compare to using a scanner?
Dedicated slab scanners like Slabsmith systems achieve sub-millimeter accuracy but cost $15,000 to $60,000, require a fixed photo station, dedicated floor space, and annual calibration contracts. Phone-based slab rectification achieves 1-2mm accuracy with zero hardware cost, works at any location, and requires no calibration or maintenance. For over 90 percent of countertop fabrication work, 1-2mm accuracy meets production requirements.
What are the calibration targets used in slab rectification?
Calibration targets are small markers placed on the slab surface before photographing. You place four targets on the slab, spread across the surface for good coverage. After photographing, you mark the target positions in the software and enter the measured distances between them. The software uses these known distances and positions to calculate the projective transformation that converts your angled photo into a true-scale top-down image.
Can slab rectification work on any size slab?
Yes. Slab rectification works on any slab size — from small remnants to full jumbo slabs. The calibration process is the same regardless of slab dimensions. Place four targets, photograph, mark positions, enter measurements. Larger slabs may require you to stand farther back to capture the entire surface in one photo, but the rectification math handles any scale.
Rectify your first slab free.
Four targets. One photo. True scale. See how slab rectification transforms a phone photo into a production-ready layout surface in under five minutes.
Start your 7-day free trial. Full access to rectification, layout, vein matching, and DXF export. No credit card required.
Want to understand the photography side? Read our slab photo calibration guide →