Digital Slab Layout: What It Is and Why Your Shop Needs It
Replace manual slab marking with a calibrated digital workflow that prevents cutting mistakes.
Digital slab layout is the process of creating a dimensionally accurate digital representation of a physical slab and placing template pieces on it before making any cuts. It is a digital dry layout — and it is changing how stone fabrication shops plan, sell, and produce countertops.
What is digital slab layout?
Digital slab layout is the practice of taking a physical stone slab — marble, granite, quartzite, porcelain, or any other surface material — and creating a calibrated digital image that preserves accurate dimensions. Once the slab is digitized, fabricators place countertop template pieces onto the image, plan seam locations, evaluate vein alignment, and generate a cutting plan — all without touching the physical stone.
Think of it as a digital dry layout. In a traditional shop, a fabricator might hold paper templates against a slab to plan the cut. Digital slab layout does the same thing, except the “slab” is a dimensionally accurate photograph on screen and the “templates” are digital piece outlines imported from a laser templater or drawn in CAD.
The key word is calibrated. A regular photograph of a slab is not a digital slab layout. A photograph has perspective distortion, unknown scale, and no dimensional accuracy. A calibrated slab image has been perspective-corrected using known reference points, scaled to true dimensions, and verified against physical measurements. Every pixel corresponds to a real-world position on the slab surface.
Digital slab layout emerged in the early 2000s with scanner-based systems that photograph slabs under controlled lighting conditions. These systems produce high-resolution, calibrated images but require significant capital investment — $15,000 to $60,000 for hardware alone, plus dedicated floor space and ongoing maintenance.
In recent years, phone-based approaches have made digital slab layout accessible to shops of all sizes. By placing calibration targets on the slab surface and using perspective-corrective algorithms, a smartphone photograph can be transformed into a dimensionally accurate slab image suitable for layout planning, client approval, and DXF export for CNC cutting.
The result is the same regardless of capture method: a digital workspace where the fabricator can plan every aspect of the cut before committing to the physical process. Piece placement, vein alignment, seam planning, waste optimization, and client approval all happen digitally. The physical slab stays untouched until the plan is finalized.
Manual vs digital: side by side
Every step of the layout process changes when you move from physical marking to digital planning. Here is what the shift looks like in practice.
Manual Layout
Digital Layout
Wax pencil marks on the slab surface that smudge, fade, and cannot be shared remotely.
Piece outlines on a calibrated slab image that are permanent, shareable, and exportable.
Paper or foam templates held against the slab. One piece at a time. Limited visibility of the whole composition.
All template pieces visible simultaneously on the slab image. Drag, rotate, and position with precision.
Vein matching by eye — hold the template, step back, squint, and hope the veins will align across the seam.
Vein alignment visible in real time as you move pieces. Zoom into seam lines. See the grain flow before cutting.
Client approval via phone call: "We are going to put the seam about two feet from the corner."
Client approval via shareable link: they see exactly what you see, on their own device, on their own time.
CNC programming from scratch. Re-enter piece coordinates manually into CAM software.
One-click DXF export. Pieces are already at true scale and positioned on the slab coordinate system.
No record of the layout after cutting. If a dispute arises, it is your word against the client's.
Complete digital archive: slab photo, piece positions, approval timestamp, and DXF export history.
The difference is not incremental. Digital slab layout changes the fundamental workflow from “mark, cut, hope” to “plan, approve, cut with certainty.” Learn how this transforms the client experience in your shop.
The three digital layout methods
Not all digital slab layout is created equal. There are three distinct approaches, each with different cost, accuracy, and practicality tradeoffs.
Scanner-Based
$15,000 - $60,000+
Dedicated camera rig with controlled lighting photographs the slab from a fixed position. The system calibrates automatically using known physical references. Produces the highest-resolution images with sub-millimeter dimensional accuracy.
Pros: Highest image quality and resolution. Consistent results. Automated calibration. Integrated with legacy fabrication workflows.
Cons:Significant capital investment. Requires dedicated floor space (80-120 sq ft). Ongoing maintenance and licensing costs. Cannot photograph slabs in the field or at a supplier's yard. Long training period.
Phone-Based
$149/month
Place calibration targets on the slab, photograph with a smartphone, and upload. Software corrects perspective distortion using target positions and creates a dimensionally accurate slab image. Achieves 1-2mm accuracy across the full slab.
Pros:No hardware investment. Works anywhere — your yard, a supplier's warehouse, a job site. Any team member with a phone can capture slabs. Learns in under an hour. Cloud-based with zero maintenance.
Cons: Accuracy depends on careful target measurement. Image quality depends on lighting conditions. Slightly lower resolution than dedicated scanner systems.
CAD-Only
Varies
Piece geometry is positioned on a rectangle representing the slab dimensions. No slab photograph is used. This is a geometric optimization tool — it shows where pieces fit on the slab but does not show vein patterns, color variation, or grain direction.
Pros: Works with existing CAD software many shops already own. Good for waste optimization on solid-color materials. No slab photography step needed.
Cons: No vein matching capability. Cannot show clients what the finished countertop will look like. No visual approval workflow. Limited value for natural stone with significant veining.
For most fabrication shops, phone-based digital layout delivers the best combination of accuracy, affordability, and practical value. You get the visual layout and client approval benefits of a scanner system without the capital outlay, floor space, or maintenance burden. Read how shops are switching from scanner systems in our slab layout without a scanner guide.
What a digital layout contains
A complete digital slab layout is more than a photograph with outlines on it. It is a structured dataset that serves multiple purposes — from client presentation to CNC programming.
Calibrated slab image at true scale
The slab photograph has been perspective-corrected and scaled so that on-screen dimensions match physical dimensions. One millimeter on the slab equals one millimeter in the digital image. This is the foundation everything else is built on.
Piece outlines with measurements
Each countertop template piece is represented as a closed polyline with accurate dimensions. Lengths, widths, cutout positions (sinks, cooktops, faucet holes), and edge profiles are all preserved from the original template data.
Seam locations and angles
Seam lines are explicitly marked on the layout. The fabricator defines where pieces join, and the layout shows the seam angle, overlap area, and how veins align across the joint. Clients see exactly where every seam will be.
Vein direction markers
Arrows or indicators show the direction of vein flow across each piece. This helps the fabricator and client understand how the grain pattern will read after installation, especially for bookmatched and waterfall configurations.
Material waste visualization
Areas of the slab not covered by template pieces are visible as open space. This makes waste calculation immediate and visual. Remnant areas suitable for secondary pieces — backsplashes, vanity tops, windowsills — are easy to identify.
DXF export coordinates
The layout exports as a true-scale DXF file using the calibration target positions as the coordinate origin. The CNC operator zeros the machine to the physical targets and cuts exactly what appears on screen. No scaling, no manual coordinate entry.
Every element in the layout serves double duty: it helps the client understand and approve the plan, and it provides the fabrication team with the data they need to execute it. For a deep dive into the DXF export specifically, read our DXF countertop layout guide.
Who uses digital slab layout
Digital slab layout touches every role in the countertop production chain. Each user interacts with the same layout data but uses it for different purposes.
Fabrication shops
For daily production planning. The shop manager or lead fabricator creates layouts for each job in the queue. Pieces are positioned on slab images, seams are planned, and the cutting order is determined before anyone touches a bridge saw. This reduces setup time at the machine and eliminates the “figure it out at the saw” approach that leads to costly mistakes on premium materials. Most shops using countertop layout software report a measurable drop in remake rates within the first month.
Estimators
For waste calculation and material quoting. An estimator can photograph a slab at a supplier's warehouse, upload it to SlabKast, and place the project's template pieces to determine exactly how much material is needed. This replaces the “add 20 percent for waste” rule of thumb with a precise, visual waste calculation. More accurate quotes mean better margins and fewer surprises when it is time to order material.
Interior designers
For client presentations and visual approval. Designers use digital slab layouts to show their clients exactly how the selected stone will look as a finished countertop. This is especially valuable for high-end residential projects where the client has chosen a $150-per-square-foot exotic material and expects vein placement to be a design decision, not a fabrication afterthought. Learn more about how designers use SlabKast.
Installers
For reference during installation. The installation crew receives the same layout the client approved. They know exactly which piece goes where, how pieces are oriented relative to vein direction, and where each seam falls. No ambiguity. No phone calls back to the shop asking which way a piece should face. The digital layout is the single source of truth from slab selection through final installation.
Everything you need to start digital slab layout
You do not need a scanner, a dedicated photo station, or a six-figure budget. Here is the complete equipment list for phone-based digital slab layout with SlabKast:
A smartphone
Any modern iPhone or Android device with a camera. You do not need the latest model — any phone from the last five years captures enough resolution for accurate slab calibration. The phone you already carry in your pocket is sufficient.
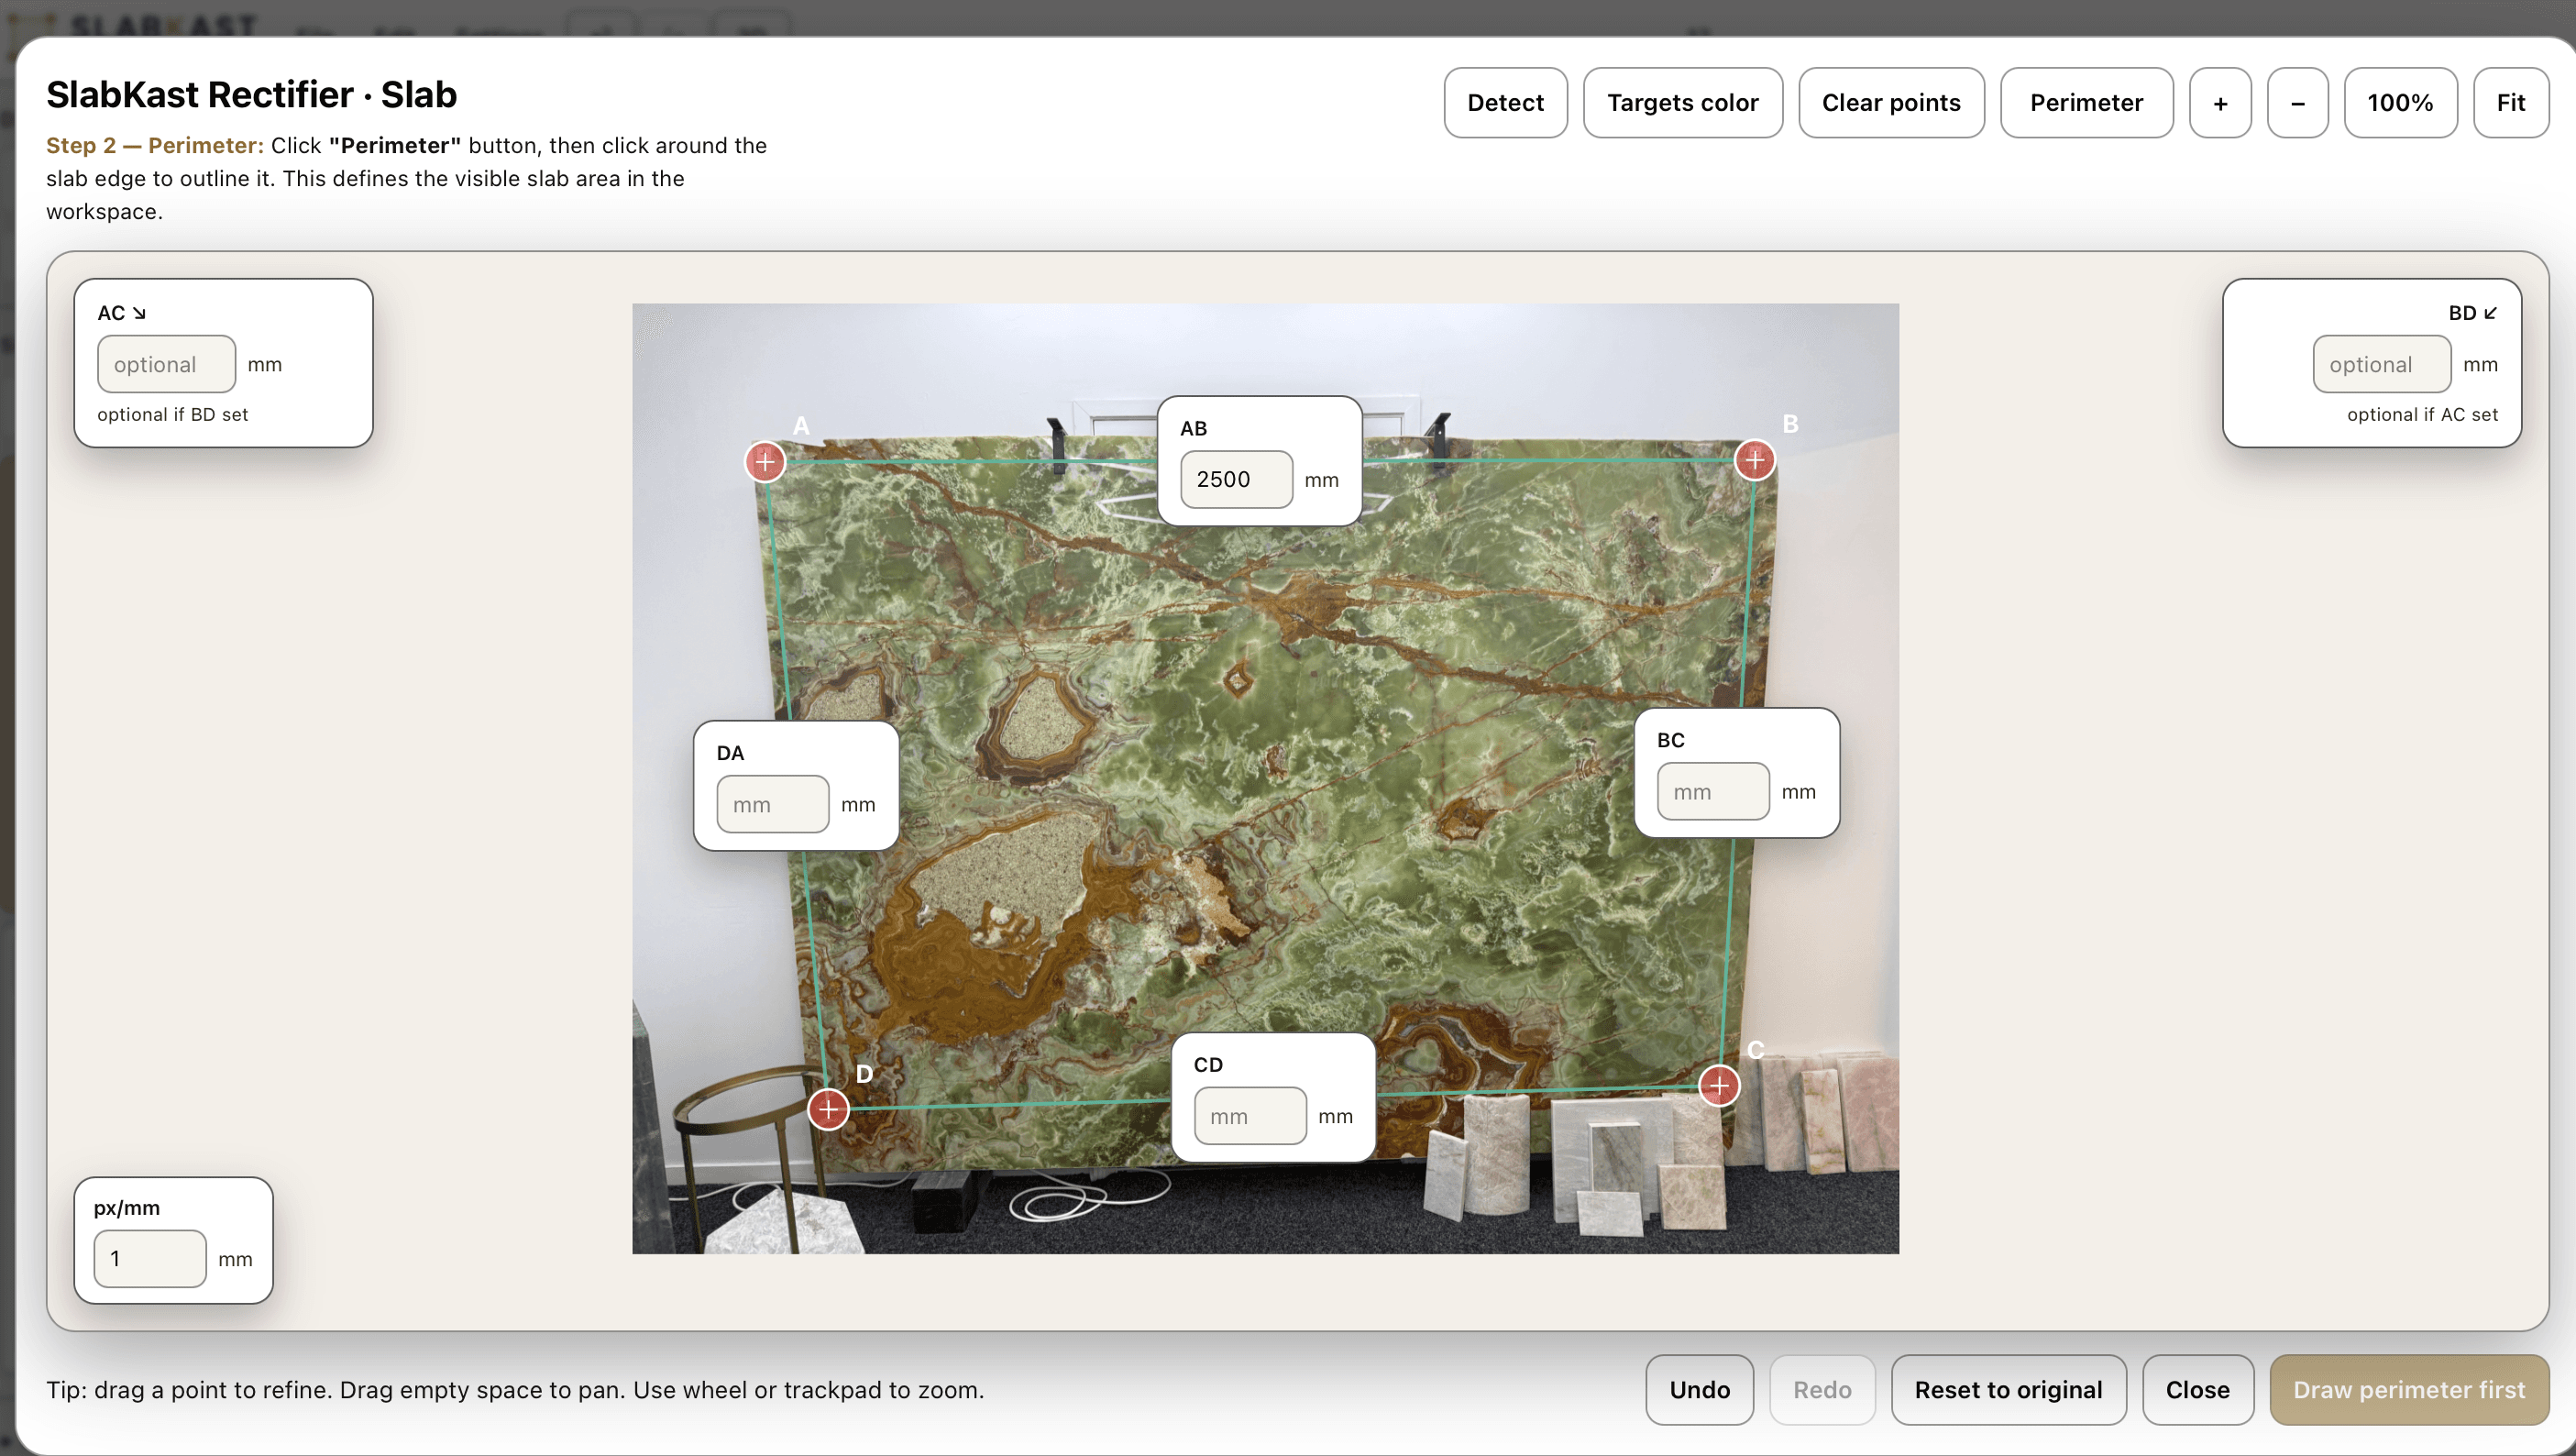
4 calibration targets
Small physical markers placed on the slab surface. SlabKast provides printable targets, or you can use any consistent markers. The targets serve as reference points for perspective correction and dimensional calibration. Place them near the four corners of the slab.
A tape measure
Measure the distances between calibration targets. These measurements are entered into SlabKast and used to scale the slab image to true dimensions. The accuracy of your layout depends directly on the accuracy of these measurements — take your time and measure carefully.
SlabKast
Sign up for a free 7-day trial. Upload your slab photo, mark the target positions, enter measurements, and start placing pieces. The entire setup process — from first photo to first layout — takes under 15 minutes.
That is the complete list. No scanner rig. No photo station. No special lighting. No installation appointment. You can photograph your first slab today and have a client-ready layout before the end of the day.
For a detailed walkthrough of the entire workflow — from photographing the slab to exporting the CNC file — read our phone photo to CNC workflow guide. For hands-on practice, follow our step-by-step tutorial.
Common questions about digital slab layout
What is the difference between digital slab layout and a CAD drawing?
A CAD drawing shows piece geometry — shapes, dimensions, and positions — but it does not show the actual stone. Digital slab layout combines piece geometry with a calibrated photograph of the real slab. You see your template pieces on the actual veining, color variation, and grain pattern of the specific slab that will be cut. CAD tells you where pieces go. Digital slab layout shows you what they will look like.
Do I need a scanner to do digital slab layout?
No. SlabKast uses a phone-based approach. You place four calibration targets on the slab, photograph it with any modern smartphone, and upload the image. SlabKast uses the known target positions to correct perspective distortion and create a dimensionally accurate slab image. The result is a calibrated digital workspace that achieves 1-2mm accuracy across the full slab — comparable to scanner-based systems for layout purposes, at a fraction of the cost.
How does digital slab layout handle multi-slab projects?
For projects that require more than one slab — such as a kitchen with a large island and long perimeter runs — SlabKast lets you create layouts across multiple slabs from the same lot. You photograph each slab separately, calibrate them independently, and then plan piece placement across all slabs in a single project view. This lets you coordinate vein direction across slabs and ensure material consistency throughout the installation.
Can I import templates from a laser templater into a digital layout?
Yes. SlabKast accepts DXF file imports. If your templater exports DXF — which most modern laser templaters do, including LPI, Prodim, and Flexijet — you can upload those template files directly into SlabKast and place them on your calibrated slab image. No need to re-draw templates or manually enter dimensions.
What accuracy can I expect from phone-based digital slab layout?
With careful target placement and measurement, SlabKast achieves 1-2mm accuracy across the full slab. This is determined by the precision of your target measurements, the quality of the photograph (good lighting, minimal angle), and the flatness of the slab surface. For layout planning, vein matching, and client approval, this accuracy is more than sufficient. The DXF export carries this accuracy through to CNC cutting.
How does the client approval workflow work?
After completing the layout, you generate a shareable link. The client receives this link via email or text message and opens it in any browser — phone, tablet, or desktop. They see the calibrated slab photo with their template pieces positioned on it, including seam locations and vein alignment. They can zoom in, pan around, and review every detail. When satisfied, they approve with a single click. The approval is timestamped and stored in your project history.
Try your first digital slab layout free
7-day free trial. No credit card required. Photograph a slab, place your templates, and see what digital layout changes about the way you plan, sell, and fabricate countertops.
Ready for CNC output? Learn how SlabKast DXF export works →